ES-1 Audio/CV Interface
User Manual
Downloads
 ES-1 schematic (pdf)
 ES-1 PCB layout (pdf)
Introduction
The ES-1 consists of 8 identical channels. Each channel consists of- A balanced input stage, capable of accepting balanced or unbalanced inputs.
- An optional rectifier circuit, for use when the audio interface is not DC-coupled.
- An output amplifier and DC offset circuit.
Finding your way around
In what follows, up/down/left/right etc. assume you're looking at the board from the component side, with the output minijack sockets on the left.The components to the right of the output sockets are the rectifier and output amplifier sections. Each channel has a trim pot and a jumper, which are arrranged from top to bottom in the same order as the output sockets.
The remaining components form the input stage. There is one further trim pot at the bottom of the board, which adjusts the DC offset, and one further jumper at the right side of the board, which is a ground lift for the input connector.
There are two multi-way connectors at the right edge of the board. The upper one is the input connector; the lower one is the power connector. The power connector follows the standard Doepfer 16 pin layout (see this page), though only the bottom 10 pins are connected (for -12V, +12V and ground). -12V is at the lower edge of the board.

AC/DC-coupling
Each channel can separately be configured to work with DC-coupled or AC-coupled audio interface outputs. This is done with the 8 jumpers labelled JP1-JP8.For AC-coupled operation, the jumper needs to be placed on pins 2 & 3. These are the lower two pins, with the board viewed as described above. This is how the unit is supplied.
For DC-coupled operation, the jumper needs to be placed on pins 1 & 2, the upper pair.
Calibration
There are a total of 9 trim pots on the ES-1 board - 8 channel gain pots and one DC offset pot. All are 25 turn multi-turn pots. A miniature watchmaker's screwdriver (with a recess for the index finger on top, like these) makes these pots much easier to adjust.When shipped, the gain pots are set to unity gain and the DC offset pot is set for 0V offset.
The gain pots offer a range of approximately 1x to 4.5x gain. 1x (unity) gain corresponds to the pot being turned fully clockwise.
The DC offset pot is simply a voltage divider between the two supply rails. Its output can be measured at pin 2 of the pot itself (the centre pin) or at pin 1 of the resistor network RN2 (the lower pin, nearest the pot), or via a resistor (so almost accurately) at IC2, IC4, IC5 & IC6 pins 3 & 12.
The actual DC offset applied to the signal depends on the channel gain. Specifically, if the channel gain is G and the trim pot voltage is V, the applied DC ofset is
( 1 + G ) x V
It is highly recommended to invest in a reasonably good multimeter if you intend to adjust the ES-1's trim pots. Adjustments can be made by ear, but the chances are your 8 channels will end up calibrated quite differently unless you can carefully measure the voltages being generated.
Calibration process - DC-coupled operation
Calibration for DC-coupled usage is pretty simple:- Check the jumpers are set correctly as described above.
- Set the DC offset trim pot for 0V offset (i.e. 0V at pin 1 of RN2).
- For each channel, use the Silent Way DC plug-in or similar to output a signal of +1.0, route it to the channel, and adjust the channel trim pot for the maximum desired voltage.
Calibration process - unipolar AC-coupled operation
This is how the module is set-up as shipped.Calibration for unipolar AC-coupled usage is pretty much the same as for DC-coupled operation, except that the jumpers are set differently. Remember that you'll need to use the Silent Way AC Encoder plug-in for AC-coupled operation.
Calibration process - bipolar AC-coupled operation
Calibration for bipolar AC-coupled usage is slightly more complex. Remember that you'll need to use the Silent Way AC Encoder plug-in for AC-coupled operation.- Check the jumpers are set correctly as described above.
- First calibrate channel 1.
- Start by setting the DC offset trim pot for 0V offset (i.e. 0V at pin 1 of RN2).
- Set the channel 1 trim pot to unity gain (fully clockwise, as noted above).
- Use the Silent Way DC plug-in or similar to output a signal of +1.0, route it to the channel, and note the voltage at channel 1 output.
- Using that and the desired maximum voltage, you can calcuate the required gain.
- Using the gain and the desired maximum voltage, you can calculate the required DC offset (using the formula above).
- Set the required DC offset (measuring the voltage on RN2 pin 1).
- Set the gain (measuring the channel output voltage).
- For channels 2-8, using no input to the channel other than the output of Silent Way AC Encoder, adjust the channel trim pot so you get 0V output.
Input wiring
The DB25 connector (where fitted) follows the Tascam DA-88 analogue wiring standard. See, for example, this page.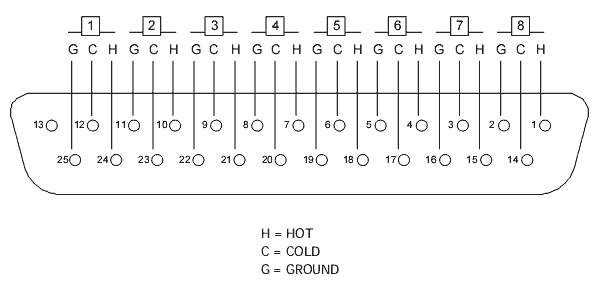
The 26 way input connector on the ES-1 board is wired so that it can be connected directly to a DB25 socket using standard IDC technology (i.e. a simple ribbon cable crimp at each end). This results in the following pinout on the connector on the board:
| 1 | 8H |
| 2 | 8C |
| 3 | 8G |
| 4 | 7H |
| 5 | 7C |
| 6 | 7G |
| 7 | 6H |
| 8 | 6C |
| 9 | 6G |
| 10 | 5H |
| 11 | 5C |
| 12 | 5G |
| 13 | 4H |
| 14 | 4C |
| 15 | 4G |
| 16 | 3H |
| 17 | 3C |
| 18 | 3G |
| 19 | 2H |
| 20 | 2C |
| 21 | 2G |
| 22 | 1H |
| 23 | 1C |
| 24 | 1G |
The input connector is designed to accept a 26-way cable-mounting IDC socket, e.g. like this. Suitable ribbon cable would be something like this. NB only conductors 1-24 are used.
I recommend the use of a proper crimping tool when attaching the socket to the cable.
Output sockets
The eight 3.5mm jack output sockets are soldered to the board itself. For those wanting to mount these on their own panel, the holes are 8.2mm in diameter, with centres spaced by 13mm.