Introduction
Encoders is a set of modules for VCV Rack to ease integration of the Expert Sleepers ES-5, ES-40, and associated expansion modules.
Install via the VCV Rack plug-in manager.
User Manual
ES-5 Encoder

Inputs 1-6 correspond to the 6 expansion headers of the ES-5. Connect to the output of an 8GT Encoder or 8CV Encoder.
Outputs: connect to the stereo audio channel driving the ES-5, usually channels 7/8 of an ES-3 or ES-8. Typically this means connecting to Rack's built-in Audio module, or the 16 channel version thereof by rcm.
To drive the ES-5's own outputs, use an 8GT Encoder connected to input 1 of the plug-in.
ES-4(0) Encoder

Inputs 1-5 correspond to the 5 expansion headers of the ES-4(0). Connect to the output of an 8GT Encoder or 8CV Encoder.
Outputs: connect to the stereo audio channel driving the ES-4(0), i.e. the S/PDIF output of your audio interface. Typically this means connecting to Rack's built-in Audio module, or the 16 channel version thereof by rcm.
8GT Encoder

Inputs 1-8 correspond to the 8 outputs of the physical ESX-8GT. Drive these from any gate, trigger etc. within Rack.
Output: connect to an ES-5 Encoder or ES-4(0) Encoder.
8CV Encoder

Inputs 1-8 correspond to the 8 outputs of the physical ESX-8CV. Drive these from any CV within Rack.
Output: connect to an ES-5 Encoder or ES-4(0) Encoder.
SMUX

Multiplexes signals when using an ADAT output (e.g. ES-3) at 88.2/96kHz. See documentation for SW SMUX (part of Silent Way).
Inputs 1-4 are the four inputs to be combined into a stereo pair. Drive these from any signal within Rack.
Outputs: connect to the audio channels driving a stereo pair on the ES-3.
Calibrator

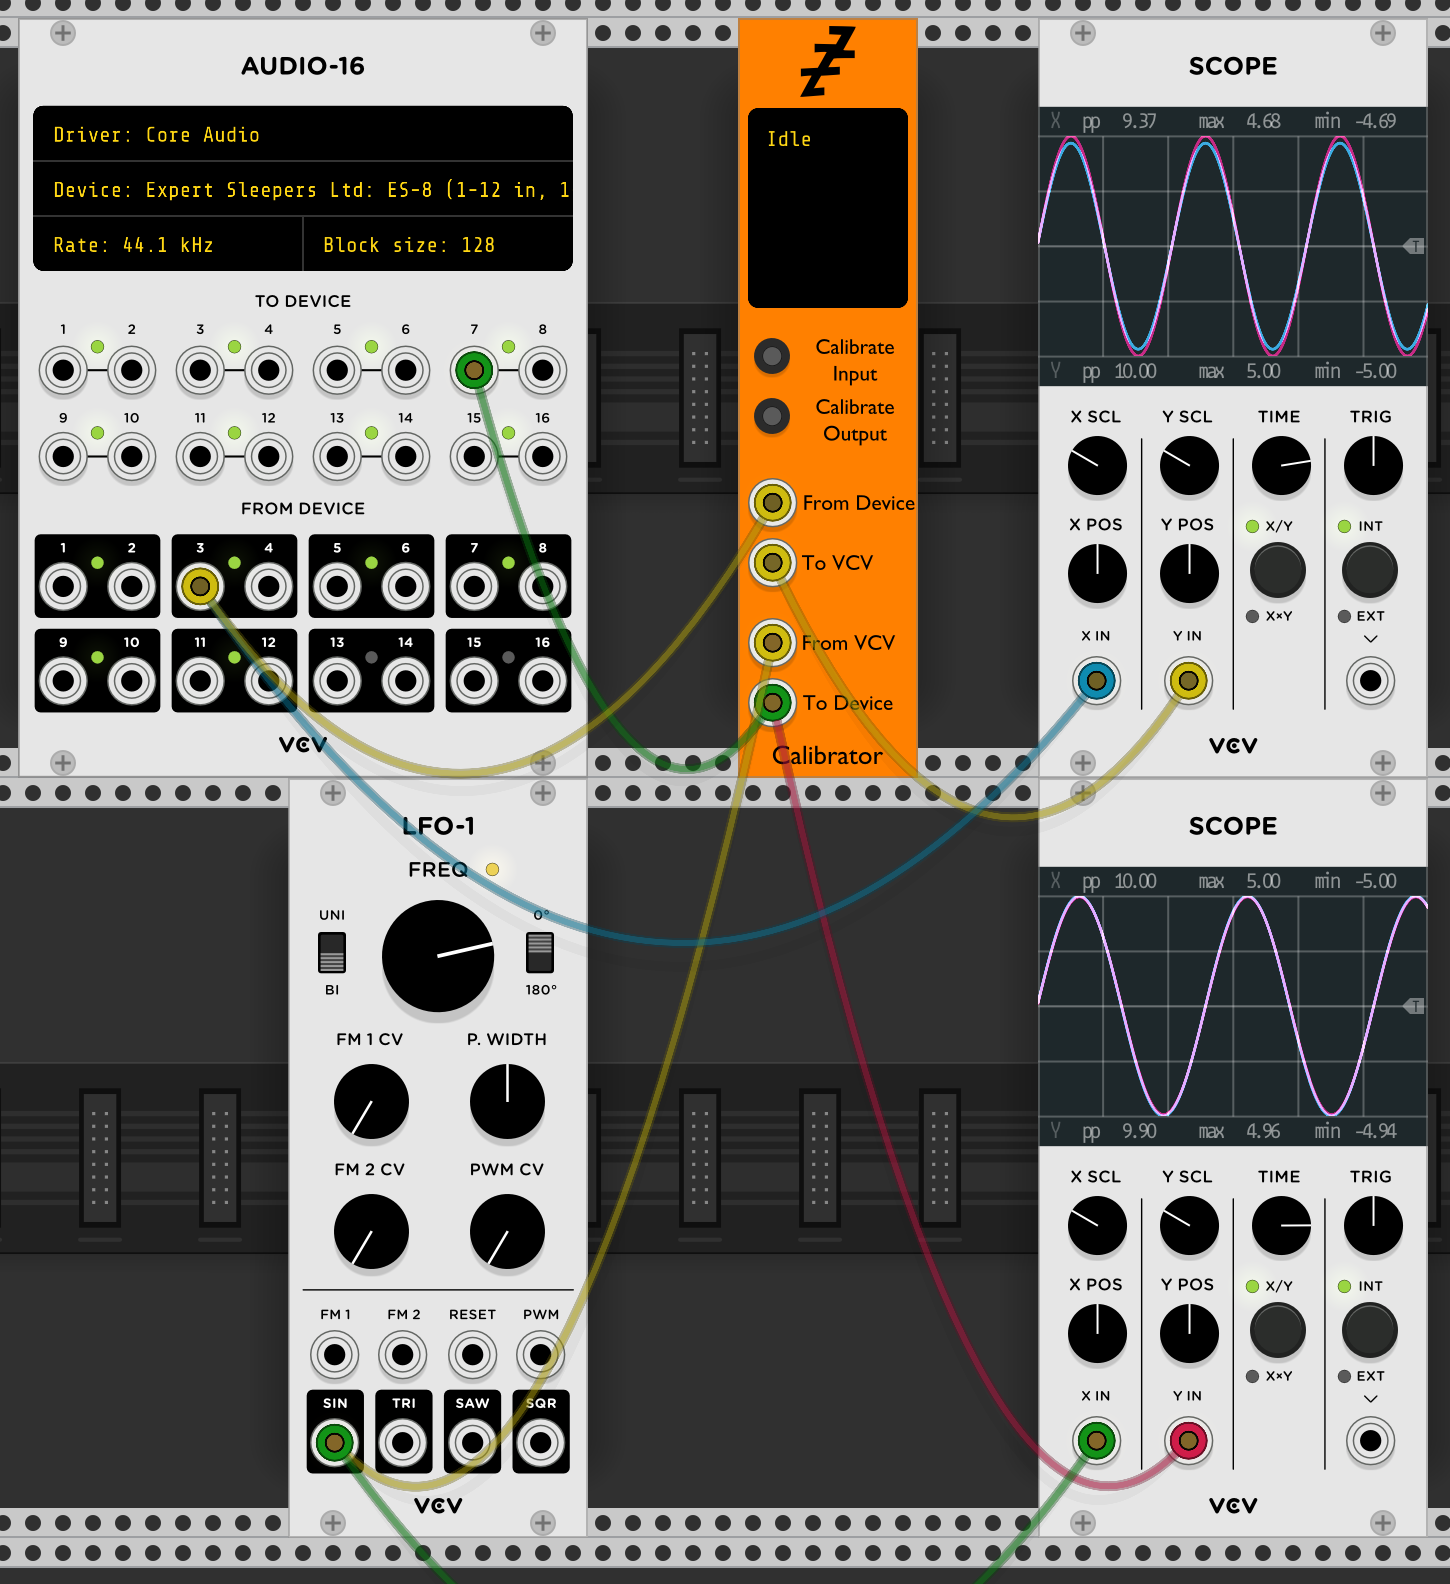
The screenshot below shows the Calibrator inserted between an Audio-16 (hosting an ES-8) and the rest of Rack. The LFO is sending a signal out of ES-8 output 7, via the Calibrator, and ES-8 input 3 is returning that same signal, again via the Calibrator. Looking at the two Scopes, you can see on the lower one that the Rack LFO is outputting ±5V exactly. This is modified on the way out (Y trace on the lower Scope) and again on the way in (X trace on the upper Scope). The result is the Y trace on the upper Scope, which is again at exactly ±5V.
The process is as follows.
First, calibrate the input. Press the 'Calibrate Input' button. You will be prompted to disconnect the (physical) input jack - input 3 on the ES-8 in our example above. When you've done this, press the button again. Then you will be prompted to connect the 3V reference to the input, and press the button again. Once you've done this, the From Device/To VCV side of calibration is complete.
Then, calibrate the output. Press the 'Calibrate Output' button. You will be prompted to connect the (physical) output to the input - in our example, ES-8 output 7 to input 3. When you've done this, press the button. The plug-in will do its thing and then return to 'Idle', at which point calibration is complete.